
I am officially a nail polish nd nail art addict...love to buy them nd try out different ideas on my nails..not a professional yet but ya I've been doing it for a long time..this is my place to show u guys my designs nd i often try to do a pictorial which might help!!!!hope u guys join me...
Friday, 30 August 2013
Mix n Match Barbie nails
Hello guys...This is a new step for me nd I wish U to help me achieve new heights....Here i have my first You Tube video to my new designs...Please SUBSCRIBE nd leave ur comments thanks for taking out time!!1Love Disha..
Wednesday, 28 August 2013
GLITTER NAILS
Hello Guys...Feeling Lazy!!!!Do not want to take out all ur brushes nd Acrylic paints.....Here is a simple deign u can do with a polish of ur choice nd some silver Glitter polishes....for A DIY video watch tutorial on my FB page linked herehttps://www.facebook.com/pages/Nail-The-Art/128291257358257?ref=tn_tnmn
Hope u guys like it nd try this out....
 If u like please comment nd if u try share them on my Fb page...C you again with another design....Buyeeee

Hope u guys like it nd try this out....


Sunday, 25 August 2013
CHEVRON FRENCH WITH FLOWERS
Hello guys...I am back with yet another design which I love so much.....I love wearing french tips and to add some extra flavor I did flowers on my ring finger and thumb!!!Here is the design also u can watch me create this luk in the video on my FB page link here!!!https://www.facebook.com/pages/Nail-The-Art/128291257358257?ref=tn_tnmn

I have not done stepwise pictures to this but check out my video!!!!on link above....
 hoppe u guys like this...LOve Disha..

I have not done stepwise pictures to this but check out my video!!!!on link above....

Friday, 23 August 2013
WHITE ON BLUE STAMPING
HELLO PEOPLE TODAY I HAVE THIS BEAUTIFUL STAMPING DESIGN FOR YOU!!!! HAVE A LUK AT THE PICTURES ND STEPWISE PICTORIAL AS WELL.... ALSO U CAN VISIT MY FB PAGE FOR A VIDEO TUTORIAL!!!https://www.facebook.com/pages/Nail-The-Art/128291257358257?ref=tn_tnmn


 1. I apply two coats of base color...This one is In the Navy no. 23 by BOURJOIS
 2. I stamp my image diagonally near the tips....

 4. Apply blue glitter polish on the outer area of the tape
 5. Apply small rhinestones to create centre of ur flowers...TOPCOAT nd ur done
I hope u like the design leave ur comments below...Thanks for being here...Love Disha..


THINGS REQUIRED!!!

Lets Begin!!!!


3. I apply two pieces nail art tape to outline my image....


I hope u like the design leave ur comments below...Thanks for being here...Love Disha..


Monday, 19 August 2013
GUEST POST By Anita For RAKSHABANDHAN
Hello guys today's post is really special...Its my first Guest in House today!!!!!
One of my Very nice nail art friend Anita from http://www.mydailynaildesigns.wordpress.com/ has done this one for all my readers....Thanks a ton for doing this Anita...
Also this design is for an Indian festival called RAKSHABANDHAN which is for all brothers and sisters....She has done this beautifully portraying the thread of love called Rakhi!!!!
Have a luk at her deign:
 Now Its time to know about Anita....
I personally love her Blog nd I was overwhelmed when she asked to do me a guest post for her....Nd now she did this for me on request!!!!So here is wat she has to say....
Hello everyone. I am Anita from the blog Mydailynaildesigns www.mydailynaildesigns.wordpress.com . I would like to thank Disha for asking me to do a guest post for her followers . I chose a festival Rakshabandhan (also called rakhi )inspired nail design as it is time to celebrate this Indian Festival which is a symbol of sister and brother’s love.
One of my Very nice nail art friend Anita from http://www.mydailynaildesigns.wordpress.com/ has done this one for all my readers....Thanks a ton for doing this Anita...
Also this design is for an Indian festival called RAKSHABANDHAN which is for all brothers and sisters....She has done this beautifully portraying the thread of love called Rakhi!!!!
Have a luk at her deign:

I personally love her Blog nd I was overwhelmed when she asked to do me a guest post for her....Nd now she did this for me on request!!!!So here is wat she has to say....
Hello everyone. I am Anita from the blog Mydailynaildesigns www.mydailynaildesigns.wordpress.com . I would like to thank Disha for asking me to do a guest post for her followers . I chose a festival Rakshabandhan (also called rakhi )inspired nail design as it is time to celebrate this Indian Festival which is a symbol of sister and brother’s love.
Before I show you how to do this design, I would like to
tell you about myself in brief as per Disha’s request . I am from New Delhi,
India and currently I live in Doha,Qatar with my family.
A proud mom of two
lovely girls who finds peace in nailart. I am new to blogging world and started
my nailart journey back in May2013. I posted my first pic in Instagram on 1stMay
and from then its no looking back. My hobby has turned into passion as I got a
lot of support from nailart family . This is how I started Nailart, I
accidentally came across CUTEPOLISH’s channel one day and was motivated to try
some of her designs and when I got little confidence I moved to ROBIN MOSES
Tutorials and started learning the details of nailart. I try to learn from all
my fellow nailartists and great bloggers and you-tubers. This is what keep me
going and I would like to advise to all who are starting and learning like me
to keep trying . Acrylic colors are my best friends and I love to create
designs according to occasions. I am still figuring out my fav. Brand of
nailpolish as I love to try most of the brands and all colors J. I think this is
enough to bore you all :P.
Lets talk about my design. I started off with a festive
green color as base from EBONY London.
Then using back of my art brush I did two big dots with
golden polish on the nails.
Then I feathered the dots with brush and made threads of
rakhi unevenly with toothpick.
After that I added two smaller pink dots inside golden dots
and added small rhinestone which is actually white sticking stone bindi. Lastly
I top coated my design.
On thumb I did a single rakhi as you can see in the pic. If
u like you can do a single rakhi on all nails as well or just on accent nail.
If you liked and recreate this design please share with me
on my facebook page HERE (www.facebook.com/mydailynaildesign)
Thanks a lot again, I hope you enjoyed my post !
Love-ANITA.....
Thanks from my side to all my readers would love to read ur comments guys nd do visit her blog for more designs....Love Disha...
Saturday, 17 August 2013
NEONS on GREY
Hello guys In this post I have a lovely design for u....It shows how to wear NEONS in a subtle way!!!Here I have used a Grey background instead of usual black...and I loved it so much!!!!Hope u too like this U can also watch a video showing how to do this design on my facebook page!!!!https://www.facebook.com/pages/Nail-The-Art/128291257358257?ref=tn_tnmn
 I have not done a stepwise pictorial since I did a video tutorial please go to the link above nd check out nd like my page as well......

Hope u love the design....U can experiment by wearing it over black or even white background also u can do the dots with one color or as ur mood is!!!!Comment belowww nd show ur love!!!
 Love Disha..


Hope u love the design....U can experiment by wearing it over black or even white background also u can do the dots with one color or as ur mood is!!!!Comment belowww nd show ur love!!!

Thursday, 15 August 2013
Independence day manicure Free Bird
Hello guys today I have a sooper special design for u!!!!This is for Indian Independence Day...This also happens to be my guest post on http://mydailynaildesigns.wordpress.com/2013/08/15/meet-disha-kulshreshtha-independence-day-nail-tutorial/....I have the pictures for u here as well as on my Fb page also a Video showing things I used on my Page.....https://www.facebook.com/pages/Nail-The-Art/128291257358257?ref=tn_tnmn...Hope u guys like this design...
 Check out the Pictorial here:
 1.Prepare ur nails with white....
 2. Dots on pinky finger nd pointer finger.
 3. Color wash waves on ring nd thumb....
 4. Write freedom nd the special pic I selected for the other hand middle finger....TOP COAT!!!!
For details on things I have used u ca watch video on my Fb page!!!! https://www.facebook.com/pages/Nail-The-Art/128291257358257?ref=tn_tnmn


 Do comment!!!!!Love Disha..


For details on things I have used u ca watch video on my Fb page!!!! https://www.facebook.com/pages/Nail-The-Art/128291257358257?ref=tn_tnmn


Monday, 12 August 2013
RED AND GOLD CROSS EFFECT>>>
Hello guys Todays design is soooper simple for those who have been doing nail art but it can be challenging for those who r new at it!!!! This happens to be the first evr design I have done a Video for!!!U can watch that on my FB page....Pictures r here hope like this simple yet gorgeous design....


Thats base I created with a NEW U polish...Coffee Glitter no. 27. After this i did these diagonal lines with an acrylic paint...In crimson color with help of a striper brush.and then I placed these studs on the overlaps....Very simple to do nd do not forget to like nd comment guys. To watch me doing this deign on camera visit my FB page...Thanks...Love Disha..


Thats base I created with a NEW U polish...Coffee Glitter no. 27. After this i did these diagonal lines with an acrylic paint...In crimson color with help of a striper brush.and then I placed these studs on the overlaps....Very simple to do nd do not forget to like nd comment guys. To watch me doing this deign on camera visit my FB page...Thanks...Love Disha..


Saturday, 10 August 2013
INDEPENDENCE DAY NAILS 1
Hellloooo guys...Super excited to share this design...This one is for our Independence day on 15th August. I'm posting it today so that it inspires those lukng for some art on nails....Here is my design for the occasion and also this is not the only one there r gonna be three minimum designs i'll be doing....here is first one
 STEP WISE PICTORIAL:

1. Paint ur nails like soBasically I have used my neons over same colors but not neons.....which gave me the required colors....
 2. In this step I made white Dasies on my pointer and pinky finger...nd big Daisy on my ring and thumb.....


TOP COAT!!!! nd ur done guys hope u like this design....Please leave a comment nd try this out....Love Disha..


1. Paint ur nails like soBasically I have used my neons over same colors but not neons.....which gave me the required colors....

3. For this step I did orange nd green Daisies on my middle finger nd Made centers with some blue color..


TOP COAT!!!! nd ur done guys hope u like this design....Please leave a comment nd try this out....Love Disha..
Thursday, 8 August 2013
PINK AND SILVER FRENCH TWIST..
Hello frns...hope u all r fine. Well today i have a simple stamping design for you guys...I did this design in less than 45 mins including drying my polish for stamping...have a luk at the pics nd how to get this luk...


1. First step is to create a base nd then i did this french tips with Zoya zp440....let it dry completely.
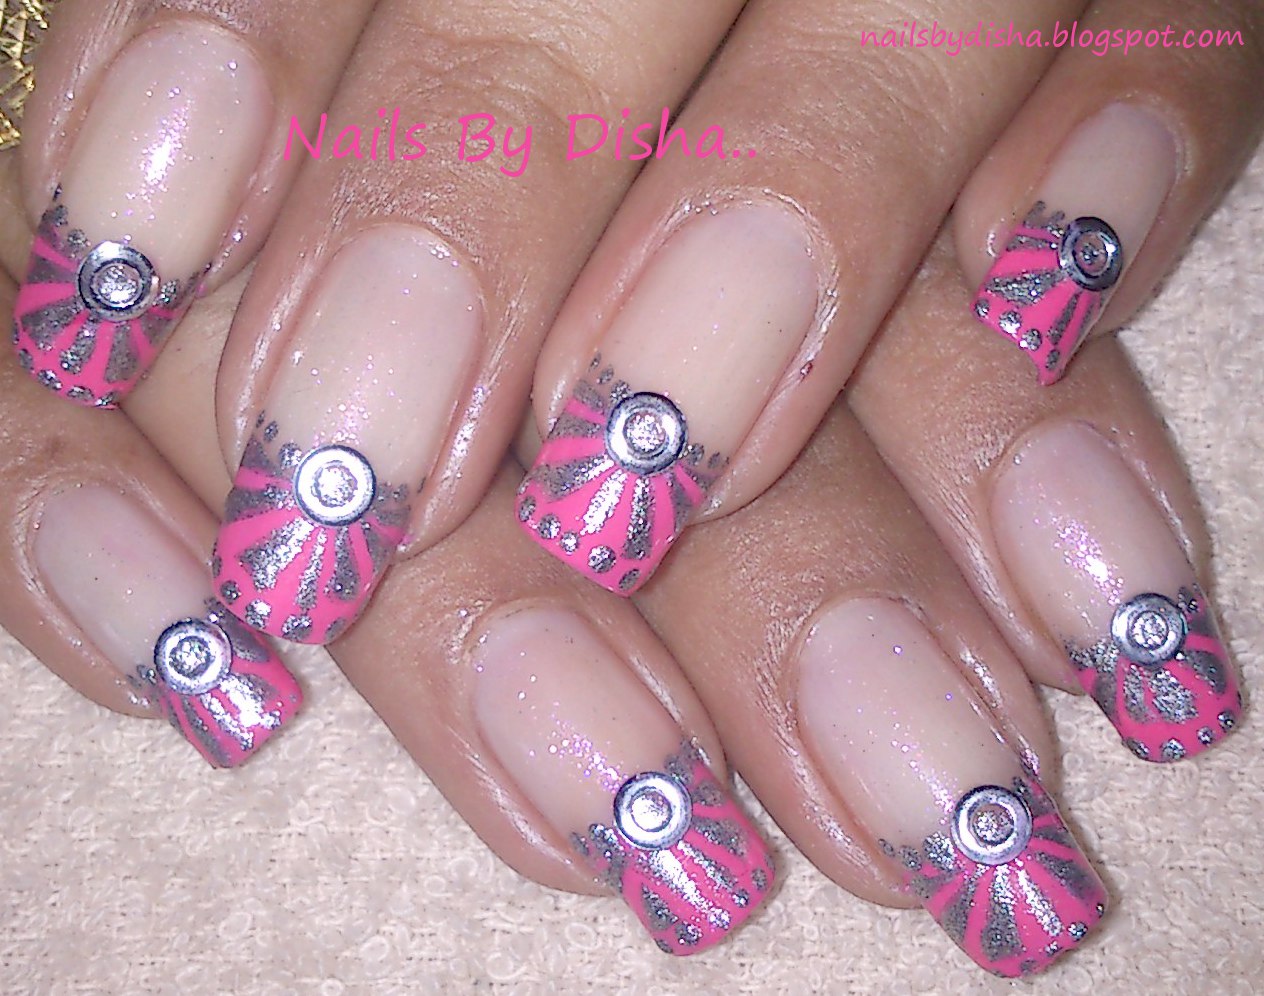
 named SEQUIN 120.the stamp was relly light so as u can c here i went again with help of brush nd same polish on the design to darken it....
 3. I also added some dots witha dotting tool on the very tips of my nails....
 4. I placed these ring studs in silver color and a few dots on the sides of the ring to complete the luk....


1. First step is to create a base nd then i did this french tips with Zoya zp440....let it dry completely.

2. then I decided to stamp nd i chose this design on konad plate..moreover i stamped with a silver polish by Revlon colorstay
 named SEQUIN 120.the stamp was relly light so as u can c here i went again with help of brush nd same polish on the design to darken it....
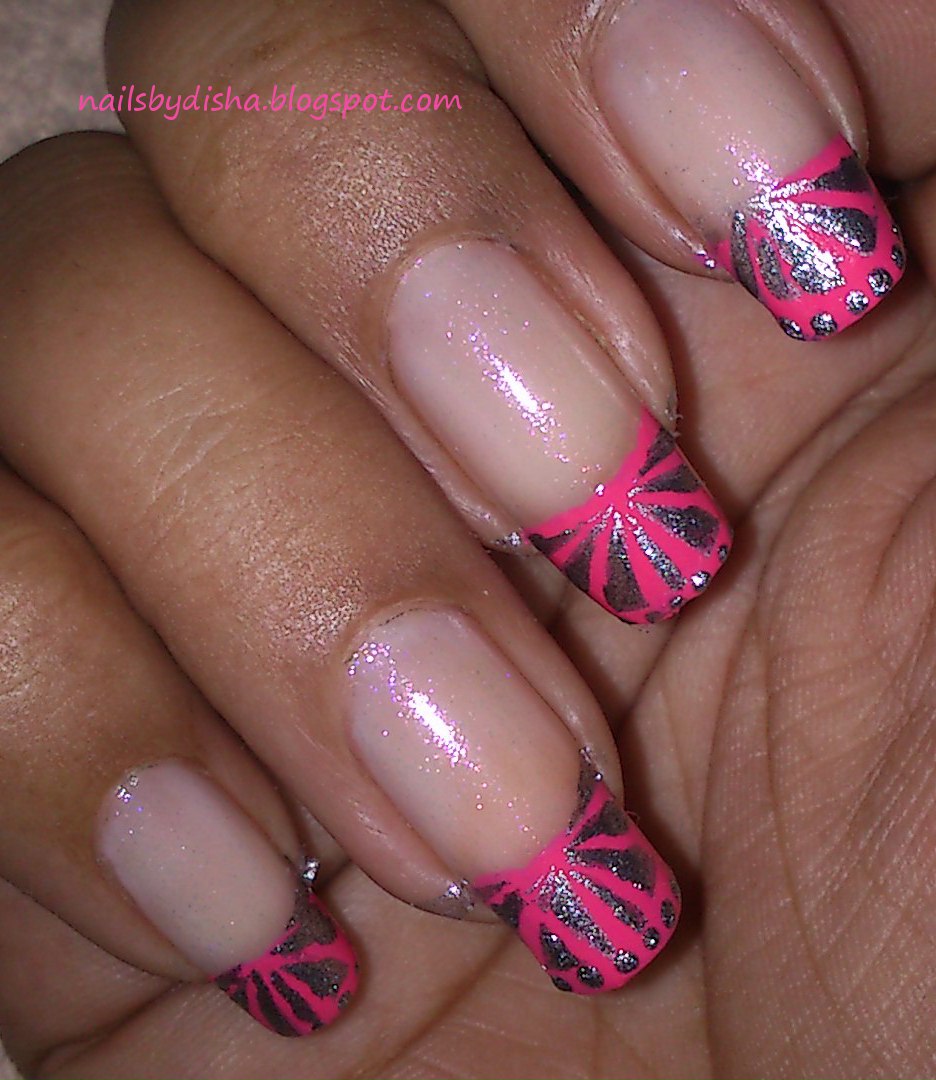


As the last step u r only left to topcoat it nd clean ur cuticles....Hope u all love wat I did please comment below and also join me to expand my circle....love Disha..
Wednesday, 7 August 2013
FIRE AND WATER
Hello friends...Today on my blog is this very special design...Its one of the designs inspired By Robin Moses whom i call my teacher... also its fire nd water based design....

Tuesday, 6 August 2013
Foil design
Hellowww guys today I'm showing out this beautiful foil design with a burst of colors....here u can check out a video showing all the things required..its my first nd just a home video not prof. at all also i brief out how i did this design....

1. I started with my base coat and then applied two coats of this beautifulll dark green.


Subscribe to:
Posts (Atom)